This is a blog post I wanted to write for a while now, but somehow never got the time for it, and I also knew that it will require lots of time, so I kept delaying it. I finally kicked my ass, sat down, and wrote it.
The goal of the post is to cover many aspects of authorization, which I found interesting from security perspective. Honestly, partially for selfish reasons so I will have a goto summary when I need to lookup something later instead of browsing through 8-10 different articles. All of these information I try catch here in one post, are known, but spread all over the place in various blog posts and articles, and I never found a good, central location with all the details. Also some of the items are very confusing and it took me some time to clear things in my head as not everything is obvious or intuitive.
When I talk about authorization here, I mean the user mode authorization on macOS, which is handled by the authdprocess. There is also a kernel authorization framework, kauth, but this post is not about that.
Let’s begin.
Main authorization concept Link to heading
I think the concepts are best described at Apple’s Authorization Concepts documentation. It’s rather old, but still valid.
There is an authorization database on the system, with various rights, that can be asked for, and if the requirement are satisfied, authorization will be granted and the asked right will be given. Based on this it might sound that an authorization could give extra rights to our process, which is both true and false at the same time. Let’s discuss first why it’s not true, as I think this is the more confusing part.
Let’s say Process A runs as a regular user and asks for the Right X, which is required to perform Task A. Let’s also assume that in order to perform Task A a process has to run as root, because it needs to write to a location where only root has access. Now, after obtaining Right X, will our process be able to perform Task A? The answer is: NO. It still runs as the standard user, which has no write access to that location. How can it still perform Task A? It can ask Process B, which runs as root, to perform Task A with showing the authorization Right X, which will be verified by Process B. If it can’t obtain the right Process B will deny the request.
This example can also be done in another way. We only have Process B running as root. Prior to executing Task A, it will try to obtain the authorization Right X, and if successful it will do the task.
These examples show that authorization is a self-restrictive model, which means that our standard POSIX processes won’t have more privileges when obtaining a right but they can limit themselves to perform specific actions and tie it to an authorization right. I think this is crucial to understand going forward.
The authorization rights that can be obtained are stored in the authorization database, which we will discuss next.
The authorization database Link to heading
The default authorization PLIST file is located at /System/Library/Security/authorization.plist. This is the file that is used to initialize the SQLITE3 authorization database, which is located at /var/db/auth.db. The database is only readable and writeable for the root user. We have two ways to read and write to this database.
- Using the
securitycommand line tool - Using
sqlite3directly on the database
The security command line tool has an authorizationdb argument which allows reading and writing to the DB. We can read as a normal user from the database using this tool, for any modifications we need to run it as root. Using sqlite3 will only work if we run it as root, because of the file permissions.
Let’s review method one first. Here is an example reading out the system.preferences.accounts right, which is the right required to make changes to users.
csaby@mac ~ % security authorizationdb read system.preferences.accounts
<?xml version="1.0" encoding="UTF-8"?>
<!DOCTYPE plist PUBLIC "-//Apple//DTD PLIST 1.0//EN" "http://www.apple.com/DTDs/PropertyList-1.0.dtd">
<plist version="1.0">
<dict>
<key>allow-root</key>
<true/>
<key>authenticate-user</key>
<true/>
<key>class</key>
<string>user</string>
<key>comment</key>
<string>Checked by the Admin framework when making changes to the Users & Groups preference pane.</string>
<key>created</key>
<real>609094350.06486595</real>
<key>group</key>
<string>admin</string>
<key>modified</key>
<real>609094350.06486595</real>
<key>session-owner</key>
<false/>
<key>shared</key>
<false/>
<key>timeout</key>
<integer>2147483647</integer>
<key>tries</key>
<integer>10000</integer>
<key>version</key>
<integer>0</integer>
</dict>
</plist>
YES (0)
We get back a typical PLIST representation. We will review some of the key parts of the entry. The class key is set to user, which means that it’s a user based right. allow-root being set to true means that the right will be granted for root, without any further authentication. The authenticate-user means to authenticate the user for this right, however this will be only effective if the user is in the admin group as specified later under the group key. This means that if our user is in this group, we can be authenticated, and if that is successful the right will be granted.
There is another type of class for authorization, and it’s not user, but rule based. The config.remove. right is an example for this.
csaby@mac ~ % security authorizationdb read config.remove.
<?xml version="1.0" encoding="UTF-8"?>
<!DOCTYPE plist PUBLIC "-//Apple//DTD PLIST 1.0//EN" "http://www.apple.com/DTDs/PropertyList-1.0.dtd">
<plist version="1.0">
<dict>
	<key>class</key>
	<string>rule</string>
	<key>comment</key>
	<string>Wildcard right for deleting rights.  Admins are allowed to delete any (non-wildcard) rights.  Root does not require authentication.</string>
	<key>created</key>
	<real>609094350.06486595</real>
	<key>k-of-n</key>
	<integer>1</integer>
	<key>modified</key>
	<real>609094350.06486595</real>
	<key>rule</key>
	<array>
		<string>is-root</string>
		<string>authenticate-admin</string>
	</array>
	<key>version</key>
	<integer>0</integer>
</dict>
</plist>
YES (0)
Here we can see the authorization class is set to rule, and later on we have a rule key, which stores, well… rules. Here it’s set to is-root and authenticate-admin. This means that the root user, and admin users after authentication can get this right.
There is also a k-of-n key, which specifies how many of the rules specified in the army has to be satisfied for granting the rule. In this case it’s 1.
There is another important authorization class, which is allow, and the config.add. right is a good example for this. This class means that anyone can get the right.
csaby@mac ~ % security authorizationdb read config.add.
<?xml version="1.0" encoding="UTF-8"?>
<!DOCTYPE plist PUBLIC "-//Apple//DTD PLIST 1.0//EN" "http://www.apple.com/DTDs/PropertyList-1.0.dtd">
<plist version="1.0">
<dict>
	<key>class</key>
	<string>allow</string>
	<key>comment</key>
	<string>Wildcard right for adding rights.  Anyone is allowed to add any (non-wildcard) rights.</string>
	<key>created</key>
	<real>609094350.06486595</real>
	<key>modified</key>
	<real>609094350.06486595</real>
	<key>version</key>
	<integer>0</integer>
</dict>
</plist>
YES (0)
This specific right is required to add an entry to the authorization database.
There are other classes, like evaluate-mechanisms, which will list several mechanisms, which will be handled by various authorization plugins. I won’t discuss this topic here. For the rule based rights, there are many other options to specify under the key, like entitled or entitled-admin.
The other way reading this database is via sqlite3, which is less convenient as the columns are not so descriptive, however it allows us an easy dump and offline review of the database. We can dump it as follows.
csaby@mac ~ % sudo sqlite3 /var/db/auth.db .dump > auth.txt
This will contain entries like the following:
INSERT INTO rules VALUES(130,'config.add.',1,4,NULL,NULL,NULL,0,NULL,0,609094350.06486594677,609094350.06486594677,NULL,NULL,NULL,'Wildcard right for adding rights. Anyone is allowed to add any (non-wildcard) rights.');
If we print the schema of the database, we can check what each entry means.
sqlite> .schema
...
CREATE TABLE rules (id INTEGER PRIMARY KEY AUTOINCREMENT UNIQUE,name TEXT NOT NULL UNIQUE,type INTEGER CHECK (type = 1 OR type = 2) NOT NULL,class INTEGER CHECK (class > 0),'group' TEXT,kofn INTEGER,timeout INTEGER,flags INTEGER,tries INTEGER,version INTEGER NOT NULL DEFAULT (0),created REAL NOT NULL DEFAULT (0),modified REAL NOT NULL DEFAULT (0),hash BLOB,identifier TEXT,requirement BLOB,comment TEXT);
...
It has one great benefit, we can list all the rule names, which is not available through the other method, so if we search for a rule where we don’t know its name exactly, this is the way we can get to it.
There is one more interesting entry in some rules, which opens up lots of confusion, and that’s the requirement key. We can typically see this when third party apps, especially privilege helper tools install new rights to the database. I have Proxyman installed, which entered the right com.proxyman.NSProxy.HelperTool.overrideProxySystemPreferences.
csaby@mac ~ % security authorizationdb read com.proxyman.NSProxy.HelperTool.overrideProxySystemPreferences
<?xml version="1.0" encoding="UTF-8"?>
<!DOCTYPE plist PUBLIC "-//Apple//DTD PLIST 1.0//EN" "http://www.apple.com/DTDs/PropertyList-1.0.dtd">
<plist version="1.0">
<dict>
	<key>class</key>
	<string>rule</string>
	<key>created</key>
	<real>610018350.78242695</real>
	<key>default-prompt</key>
	<dict>
		<key></key>
		<string>Proxyman is trying to override Proxy config in System Preferences.</string>
	</dict>
	<key>identifier</key>
	<string>com.proxyman.NSProxy</string>
	<key>modified</key>
	<real>610018350.78242695</real>
	<key>requirement</key>
	<string>anchor apple generic and identifier "com.proxyman.NSProxy" and (certificate leaf[field.1.2.840.113635.100.6.1.9] /* exists */ or certificate 1[field.1.2.840.113635.100.6.2.6] /* exists */ and certificate leaf[field.1.2.840.113635.100.6.1.13] /* exists */ and certificate leaf[subject.OU] = "3X57WP8E8V")</string>
	<key>rule</key>
	<array>
		<string>allow</string>
	</array>
	<key>version</key>
	<integer>0</integer>
</dict>
</plist>
YES (0)
As we can see, there is a requirement key with a long code signing blob. In fact this is the csreq (=code signing requirement) of the application installed this right, which is Proxyman in this case. Using common sense, one would think that only apps satisfying the code signing requirement can obtain this right, however that is not right. This requirement has nothing to do about who can obtain the right. Anyone satisfying the rule can get it. In this particular case it’s set to allow, which means anyone asking for the right will obtain it. This false understanding lead to privilege escalation bugs in the past, like CVE-2019-13013.
The only place where the requirement is (was) important is when we want to modify the rule. We can find this in Security-59306.61.1/OSX/authd/server.c.
static bool _prompt_for_modifications(process_t __unused proc, rule_t __unused rule)
{
//    <rdar://problem/13853228> will put back it back at some later date
//    SecRequirementRef ruleReq = rule_get_requirement(rule);
//
//    if (ruleReq && process_verify_requirment(proc, ruleReq)) {
//        return false;
//    }

    return true;
}
We can see that if the process satisfies the code signing requirements then there is no need to prompt otherwise yes. However it was set to always prompt, due to some issues and the actual check is commented out.
Next I go back to the authorization concepts to discuss how these come into play in factored applications, because that can be interesting from security perspective.
Factored applications (privileged helper tools) Link to heading
Apple offers two main methods for applications to execute privilege actions. Using the AuthorizationExecuteWithPrivileges API, which is deprecated or using a factored application. A factored application means that we install a privileged helper tool through launchd, which runs as root, and we talk to this helper app through some form of IPC and asks action. The IPC is mostly XPC these days, however sockets, Mach, and Distributed Objects can be still found.
Let’s discuss briefly the deprecated API. This was extensively covered by Patrick Wardle in his blogpost, I will only do a high level overview here.
When this API is invoked, an XPC message will be sent to the authorization daemon, authd. It will check the database for the system.privilege.admin rule, and if needed authenticate the user through Security Server. If authorization was successful, security_authtrampoline will be invoked to execute the required binary. security_authtrampoline is a SUID binary, owned by root, so it will run with root privileges. It will also verify the authorization info before execution.
This API is considered insecure, as security_authtrampoline won’t perform any validation of the binary, and if it’s writeable for the user, it opens the door for privilege escalations.
Moving on to factored applications, authorization can work through several ways. The recommended way doing this is using pre-authorization for better performance, however it’s not strictly needed as it doesn’t add extra security. The process is illustrated on Apple’s flow chart I took from the Authorization Concepts document.
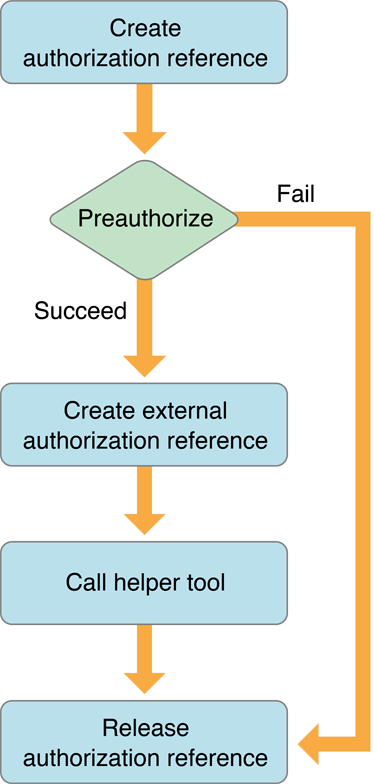
The calling app has to create an empty AuthorizationReference first. If pre-authorization happening it needs to try to get authorization rights and ad it to the AuthorizationReference. When the application tries to obtain the rights it can chose if user prompting is allowed or not. However if user authentication is required by the specific rule for the given right, and the application doesn’t allow prompting, the authorization will fail.
Next it needs to crate an AuthorizationExternalForm from the AuthorizationReference, and pass it to the helper tool. This external reference is a 32 byte long binary data, which, if guessed by any application it can be used and potentially lead to privilege escalation.
The helper tool process is shown on Apple’s drawing.
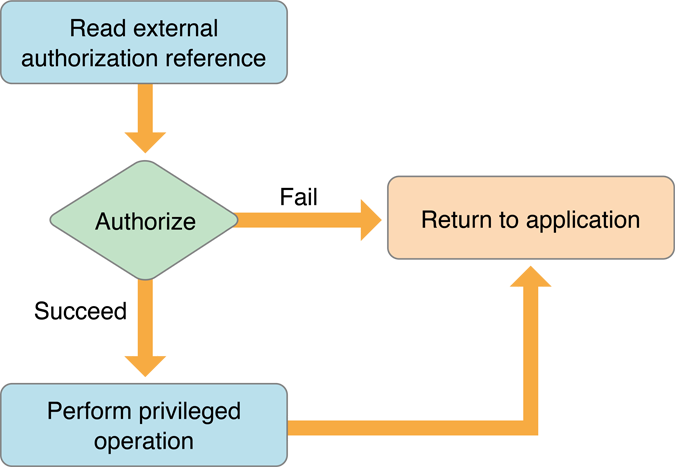
The helper tool takes the AuthorizationExternalForm and converts it back to a AuthorizationReference and performs the authorization. If successful it will perform the privileged action.
I need to highlight that the authorization which is happening at the privilege helper tool is happening on behalf of the original client based on the reference. This is important as the helper tool runs as root, and as such it could get almost any right from the system. When performing authorization it can chose again to prompt for user authentication or not. If it was done in the main app already during preauthorization, there is no need for that, otherwise yes.
To give an example, let’s examine the following logs. These are from my very first attempt to exploit F-Secure’s XPC privileged helper tool, which I documented here in more detail.
info	14:57:42.800020+0100	authd	Process /usr/local/f-secure/bin/fscsafeadmind.xpc (PID 300) evaluates 1 rights with flags 00000002 (engine 82): (
    "system.privilege.admin"
)
debug	14:57:42.800041+0100	authd	engine 82: user not used password
debug	14:57:42.800060+0100	authd	engine 82: checking if rule system.privilege.admin contains password-only item
debug	14:57:42.801121+0100	authd	engine 82: _preevaluate_rule system.privilege.admin
debug	14:57:42.801198+0100	authd	engine 82: evaluate right system.privilege.admin
debug	14:57:42.801316+0100	authd	engine 82: using rule system.privilege.admin
error	14:57:42.801378+0100	authd	Fatal: interaction not allowed (kAuthorizationFlagInteractionAllowed not set) (engine 82)
debug	14:57:42.801397+0100	authd	Failed to authorize right 'system.privilege.admin' by client '/usr/local/f-secure/bin/fscsafeadmind.xpc' [300] for authorization created by '/Users/csaby/Desktop/F-Secure Mac Protection.app' [1180] (2,0) (-60007) (engine 82)
debug	14:57:42.801444+0100	authd	engine 82: authorize result: -60007
error	14:57:42.801471+0100	authd	copy_rights: authorization failed
F-Secure used pre-authorization for sensitive actions, and it prompted the user during that phase on the main application. As preauthentication already happened, the privileged helper had no need to prompt for user interaction. Thus if authentication wasn’t performed before, the privilege helper failed, and this is what we see in the logs, where I didn’t do preauthorization. The fscsafeadmind.xpc process tries to obtain the system.privilege.admin right. We can see next that the rule is being evaluated, and then it fails. The log clearly indicates that the authorization was performed for the client F-Secure Mac Protection.app (where I injected my dylib).
I still think that relying only on authorization only in privilege helper tools is not secure enough, as macOS users are used to get authentication prompts frequently and they will likely authenticate even if a malicious app asks for it. I discussed this in more detail here.
Next we will review how the Authorization API works.
The Authorization API Link to heading
I will start with a sample code I frequently use in XPC exploits to obtain an empty authorization.
AuthorizationExternalForm create_auth(AuthorizationRef authref) {
    //local variables
    NSData                      *authorization;
    OSStatus                    err;
    AuthorizationExternalForm   extForm;
    //setup an empty authorization
     err = AuthorizationCreate(NULL, kAuthorizationEmptyEnvironment, kAuthorizationFlagDefaults, &authref);

     if (err == errAuthorizationSuccess)
     {
         err = AuthorizationMakeExternalForm(authref, &extForm);
     }
    return extForm;
}
The first function we need to start with is AuthorizationCreate. With passing kAuthorizationEmptyEnvironment and kAuthorizationFlagDefaults it will create an empty authorization reference. If successful we can convert it to an AuthorizationExternalForm using AuthorizationMakeExternalForm. This operation is normally successful as anyone can get an empty right.
To obtain an actual authorization right we need to use the AuthorizationCopyRights function, shown below.
AuthorizationCopyRights(
                authRef,
                &rights,
                NULL,
                kAuthorizationFlagExtendRights | kAuthorizationFlagInteractionAllowed,
                NULL
            );
This is the function where we can specify if we allow user interaction during obtaining the right or not using the kAuthorizationFlagInteractionAllowed flag.
To interact with the database we can use AuthorizationRightGet, AuthorizationRightSet and AuthorizationRightRemove. The full API documentation is available at Apple’s Authorization Services Documentation.
Next we will see how we can retrieve logs.
Logs Link to heading
In the past there was the /var/log/authd.log file, however since unified logging was introduced back in 2016, it faded away, and it doesn’t exists anymore. If we need to read authd related logs we can query the com.apple.Authorization subsystem with the log show command as shown below.
csaby@mac ~ % log show --style syslog --predicate 'subsystem == "com.apple.Authorization"' --last 1h
Filtering the log data using "subsystem == "com.apple.Authorization""
Skipping info and debug messages, pass --info and/or --debug to include.
Timestamp                       (process)[PID]
2020-10-21 23:13:48.701287+0200  localhost authd[230]: [com.apple.Authorization:authd] session owner 501 is member of group admin (does satisfy rule) (engine 6437)
2020-10-21 23:13:48.799285+0200  localhost authd[230]: [com.apple.Authorization:authd] engine 6437: running mechanism builtin:authenticate (1 of 4)
Exploitation consideration Link to heading
I wanted to document two issues I run into during exploit development, and it took me long time to figure out what’s the problem, and why authorization fails.
If we run a binary from a TCC protected location, like Desktop authorization will fail. This is because authd doesn’t have access to these places, and thus error out. Running the same application from /tmp/ or any other place which is not privacy protected will work.
If we pass AuthorizationExternalForm via IPC to another process, we must wait till the target process consumes our request and performs authorization, as if the calling application exists too fast or uses AuthorizationFree on the original AuthorizationReference the AuthorizationExternalForm will be invalidated by the system, and thus authorization will fail.
Wrap up Link to heading
I hope this post will be useful for others as well who wants to dive into the authorization framework on macOS. I put together a reference where someone can read even further, these are the posts I used as a resource, and I recommend them as further reading.
The framework is open sourced by Apple, and it can be found in the Security pack.
References Link to heading
- Secure coding XPC services - Part 1 - Why EvenBetterAuthorization is not enough? (CVE-2019-20057)
- Authorization Concepts
- AuthorizationExecuteWithPrivileges
- Authorization Rights and Mavericks
- Authorization Rights available on macOS
- Demystifying root on macOS, Part 4 —The Authorization Database – Scripting OS X
- Managing the Authorization Database in OS X Mavericks | Der Flounder
- Unauthd
- Sniffing Authentication References on macOS
- The Story Behind CVE-2019-13013